Audacity may be downloaded in two forms; one with help files and the other with help files available via the Internet. I suggest you set up Audacity with embedded help files in case the Internet connection at your teaching location is slow or nonexistent.
Audacity cannot export .mp3 format files with installing the LAME plugin. Due to licensing restrictions, Audacity does not supply LAME but there is a link to download it on the Audacity website. It will be needed to export your edited soundtrack in .mp3 for use in Soundslides.
Alternatively you can export your edited Audacity file as a .wav or .aiff and convert it to an .mp3 using Switch, a free sound format converter. Look carefully for the link to the fee version.
Notice that you must export your soundtrack from Audacity, or other sound editing software, at either 44.1 kHz or 22.05 kHz at 16-bit resolution. I recommend 44.1 kHz.
Normally the output of a Soundslides project is a Flash program. There is a trick to configuring the output so that it will play on Apple products such as iPhone and iPad, with use the IOS operating system. The late Steve Jobs did not like Flash so these products will not display Flash. IOS products will display media served as HTML5 and Soundslides can be configured to serve HTML5 to IOS products.
Once you are in the Soundslides panel with the time line and the image icons, select Template/Shell/ios_html5. That’s all there is to it.

When you are finished with the Soundslides story, hit the “Export” button. You will find a new folder inside the project folder labeled “Publish to Web.” That is the file you, or a Webmaster, will move to a web server typically using an FTP program such as Filezilla. Naturally, you will want to rename this folder such that the name indicates the content.
Suppose I rename the “Publish to Web” to “Brownsea_Island” and place it in within a folder “Soundslides” on my webserver. Since my domain is “brownimages.com,” the actual path is http://brownimages.com/soundslides/Brownsea_Island .
If you click the link it will play. Look in the URL window of your browser and you will see the exact link above. But what if I want it to play in a blog page, which is a completely different area of the web server. Embed code is needed but fortunately I don’t have to write it. The Soundslides website offers a utility that will write the code for me.
Go here:
http://tools.soundslides.com/embed/
Enter the actual URL of your story. If you have selected the html5 shell as above you will see the following display.

Clicking on the link shows this:

The embed code has been automatically written to be copied and pasted into the particular web page to display the story such as:
http://brownimages.com/blog/brownsea-island/
This URL is different from the actual URL but the embed code correctly points to the actual URL. You can edit the embed code to adjust the size of display.
Preparing Pictures and sound
Soundslides allows playing picture “full-screen” which will display images as large as the originals surrounded by black. Size pictures 1280 px in width, or larger, so that full-size display will have larger pictures. Normal display will be smaller and is under your control as you edit the project.
Details on prepping pictures and sound files are found here:
http://support.soundslides.com/index.php?pg=kb.page&id=136
Preparing Pictures and Soundtrack for Importing into Soundslides
Create a folder with the same root as your Soundslides project folder but add “-source_files.
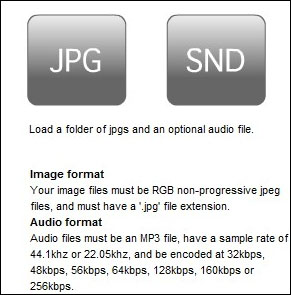
If my Soundslides project folder were “Brownsea_Island” then my folder for my source files would be “Brownsea_Island-source_files.” In this file place your source JPG files and your finished soundtrack. When you create a project, Soundslides has a button to import JPGs. Click it and point it to you source file folder. The other button labeled “SND” will import your soundtrack from the same folder. For JPGs point to the folder and for SND point to the file within the folder. When you import JPGs, the soundtrack is ignored. This method keeps your source files tidy within one folder.
Can I convert Soundslides to a Movie?
Yes you can. Go here:
http://support.soundslides.com/index.php?pg=kb.page&id=132
Follow the steps.
You will get confirmation and an email if you entered an email address.

Dissolve to Black and Title Slides
If you want your story to dissolve to black at the end, and you usually do, you will have to provide a black JPG file. That file can easily be the byproduct of making a title slide.
Suppose you want the title to dissolve on and off a particular photograph. I bring the photograph into Photoshop and create the text of the title. In Photoshop, the text is automatically place on its own layer. You can sometime use the color eyedropper to pick up a color in the picture for the color of the text. You can create a drop-shadow as well. You can move the text to exactly where you want it in the picture.
To have the title dissolve on and off, you need three photographs in this order: picture, picture with text, picture. Expose the Layers pallet in Photoshop and click the eyeball icon to the left of the text layer. This shows the picture alone. Now use Save As twice and label one Title-1.jpg and the second Title-3.jpg. Click the eyeball icon next to the text layer so that it shows and use Save As a third time to save Title-2.jpg. Place all three pictures in numeric order in Soundslides and the title will dissolve on and off.
You can create a layer filled with black in the same file and use Save As to create Black.jpg so that you can dissolve in from black or dissolve out to black at the end. If you want to do both, you will need two black files with different names such as blackintro.jpg and blackout.jpg.
Summary
Audacity
1. Install Audacity with help files.
2. The LAME plugin is required in this workflow.
3. Export edited soundtrack as mp3 format, 44.1 kHz, 16 bits.
Mindy McAdams has written an Audacity_Guide.
Folder Creation
4. Create a name for your project.
5 Create a source file folder for your pictures and soundtrack using the name of your project with “-source_files” added, without spaces, to the end of the project name.
Soundslides
6. Read Soundslides page on prepping pictures. http://support.soundslides.com/index.php?pg=kb.page&id=136 I use 1280 pixels for picture width, which displays nicely in full-screen mode.
7. In Soundslides, create a new project and save it in the same location as your source file folder.
8. Import your JPGs by pointing to the source file folder.
9. Import your soundtrack by pointing to the soundtrack file with the source file folder.
10. Select Template/Shell/html5 to ensure your story may be seen on Apple devices.